Creating an Alien Themed Linux Greeting Card
Stephen Brennan • 14 June 2017My (former) roommate is a big fan of the Alien series, especially the classic first movie, and the really awesome video game, Alien: Isolation (I guess you could say I’m a fan too!). As a goodbye gift, I thought I’d create a really odd e-card: a bootable Linux flash drive with the same boot splash as computers from the movie, sound effects from the movie and game, and programs that look like the ones in the game. Everything turned out much better than I hoped, and so I thought I’d share the method and the result in a blog post!
The foundation
I’m an Arch Linux user, so when I think of creating a bootable Linux disk, the first thing that comes to mind is the archiso tool. This is the set of scripts that creates the bootable Arch Linux “installer” ISO image, and it can be customized for a lot of other stuff. I started my project by copying all of the scripts and configuration files into my own repository.
Customized boot splash
The first thing I wanted to do was have a similar boot up splash screen to the
computers you see in the film Alien. At the beginning of the movie,
you can see a splash screen that contains NOSTROMO (the ship’s name) and a
serial number. Here’s a capture of that particular moment:
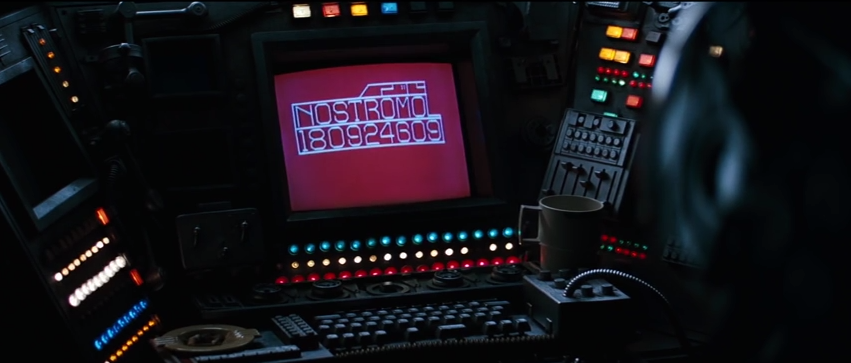
I was able to find an artist’s reproduction of this image on DeviantArt, which I figured I could use (sans the watermark) as the boot image. Of course, to make it a boot splash screen, I had to use a special program, Plymouth. This tool, used on a number of Linux distributions, allows you to create a boot theme which is displayed instead of the console messages your kernel and init system would otherwise output.
However, creating a theme requires either writing a C extension to Plymouth, or learning an arcane scripting language and writing the extension in that. I opted for the scripting language. More accurately, I followed a set of tutorials right up until the point where I had what I wanted. The result: plymouth-theme-nostromo, which is incidentally available in the AUR.
Sound effects
At the beginning of Alien, the computer makes all sorts of beeping, whirring, and clattering noises. Since I really enjoy all of the sounds in the movie and game, I had to get these sound effects into the boot sequence as well! So, I found a video containing all of these sound effects on Youtube.
I used youtube-dl to get the audio from this video, and I cut it to just the
first part (nothing involving the later scene with Mother). Then, I wrote a
systemd unit file which would play the sound as soon as sound is available:
# /etc/systemd/system/startupsound.service
[Unit]
Description=Boot Sound
After=alsa-restore.target

[Service]
Type=simple
ExecStart=/usr/bin/startupsound

[Install]
WantedBy=multi-user.target
This just calls a shell script:
#!/bin/sh
amixer sset Master unmute
aplay /var/local/startup.wav
The script just unmutes sound and then plays my startup sound. Of course, if you want to create a cool atmosphere, you need to more than just computer sounds. Another thing I wanted was to have some ambient “spaceship” sound. Another Youtube video provided this. I trimmed a portion of that and set it on a loop in another bash script, and then created another systemd unit file for that.
Finally, I wanted to add a bit of tension to the atmosphere… as if an alien could attack you at any moment. So I found some alien noises from Alien: Isolation in yet another Youtube video. I selected my favorites and put them in a directory. Then I created this Bash script to play a randomly selected sound every 30-90 seconds:
#!/bin/bash

files=(/var/local/alien-sfx/*.mp3)
while :
do
	sleep $[ ( $RANDOM % 60 ) + 30 ]s
	mpg123 "${files[RANDOM % ${#files[@]}]}"
done
Again, I hooked it up to a systemd unit file, and I was set.
Retro terminal
Now, what to do once the flash drive actually boots? In Alien all of the computers are stylized with green text on black background, on CRT screens. The default Linux console can probably be customized a little bit, but not enough to resemble the movie. So I decided to go a different route.
cool-retro-term is a terminal emulator which aims to look like an old CRT screen. It is also fairly customizable, so I was able to create a profile that looks exactly like I envision a computer on the Nostromo would look like. Here is this terminal emulator running my normal shell:
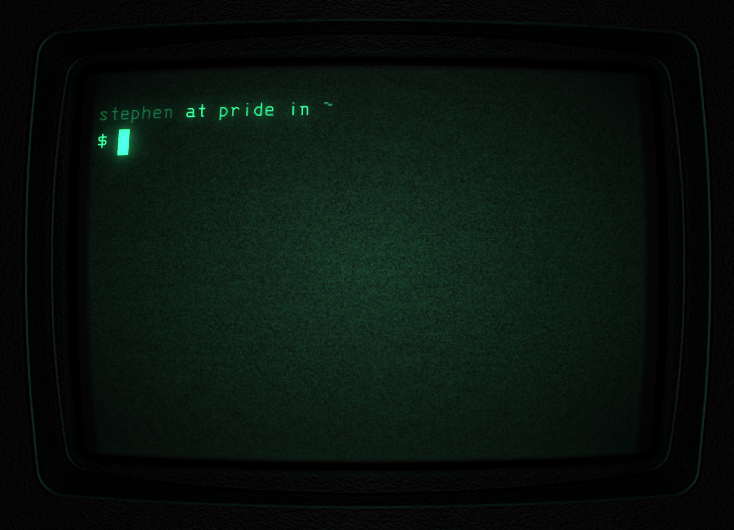
While cool-retro-term is customizable, getting it to use my custom theme at
launch turned out to be a hassle. There is a theme export function, but no
command line option for specifying an exported theme to load at launch. So, I
decided I would simply configure it on my computer and copy all necessary “local
storage” files onto the ISO. I used strace to locate the (rather well hidden)
sqlite configuration database, and included it on the ISO.
Terminal at boot
Since Arch CD’s normally boot directly to the console, and cool-retro-term is a
graphical terminal emulator, I had to figure out some way get the computer to
go directly from the boot splash screen into the cool-retro-term. This, of
course, requires an X server, and maybe a window manager or desktop environment.
Plus, for a seamless transition, startx won’t work (it displays the Linux
console first). So I also needed a display manager which I could configure to
automatically log in.
The combination I finally settled on (after much trial and error):
- LightDM as the display manager, configured for automatic login
- Openbox as the window manager, with no other desktop environment
- To auto-start cool-retro-term, I popped a little script into
~/.config/openbox/autostartwhich starts cool-retro-term in full screen.
Terminal customizations
To make the terminal feel a bit more like the ones that might have been on the
Nostromo, I decided that the terminal prompt should take a little extra time
between commands to appear (making you feel like you have a slow computer), and
there should be some computer clattering noises (again from the movie) during
each command. To achieve this, I sourced bash-preexec and then put this
inside of the .bashrc:
preexec() {
	(mpg123 /var/local/cmd.mp3 &> /dev/null & sleep 0.4)
}
My bashrc also included some “initialization” messages to make it seem like
the computer could “control” flight systems of the Nostromo.
“Personal Terminal”
The final ingredient I wanted to emulate in my system was the “personal terminal” interface found in Alien: Isolation. For those who haven’t played the game (you should), these are computer terminals found throughout the ship. You can interact with them, reading files left there by the crew, and maybe issuing “commands” to interact with the ship. A typical screenshot of this interface is below:
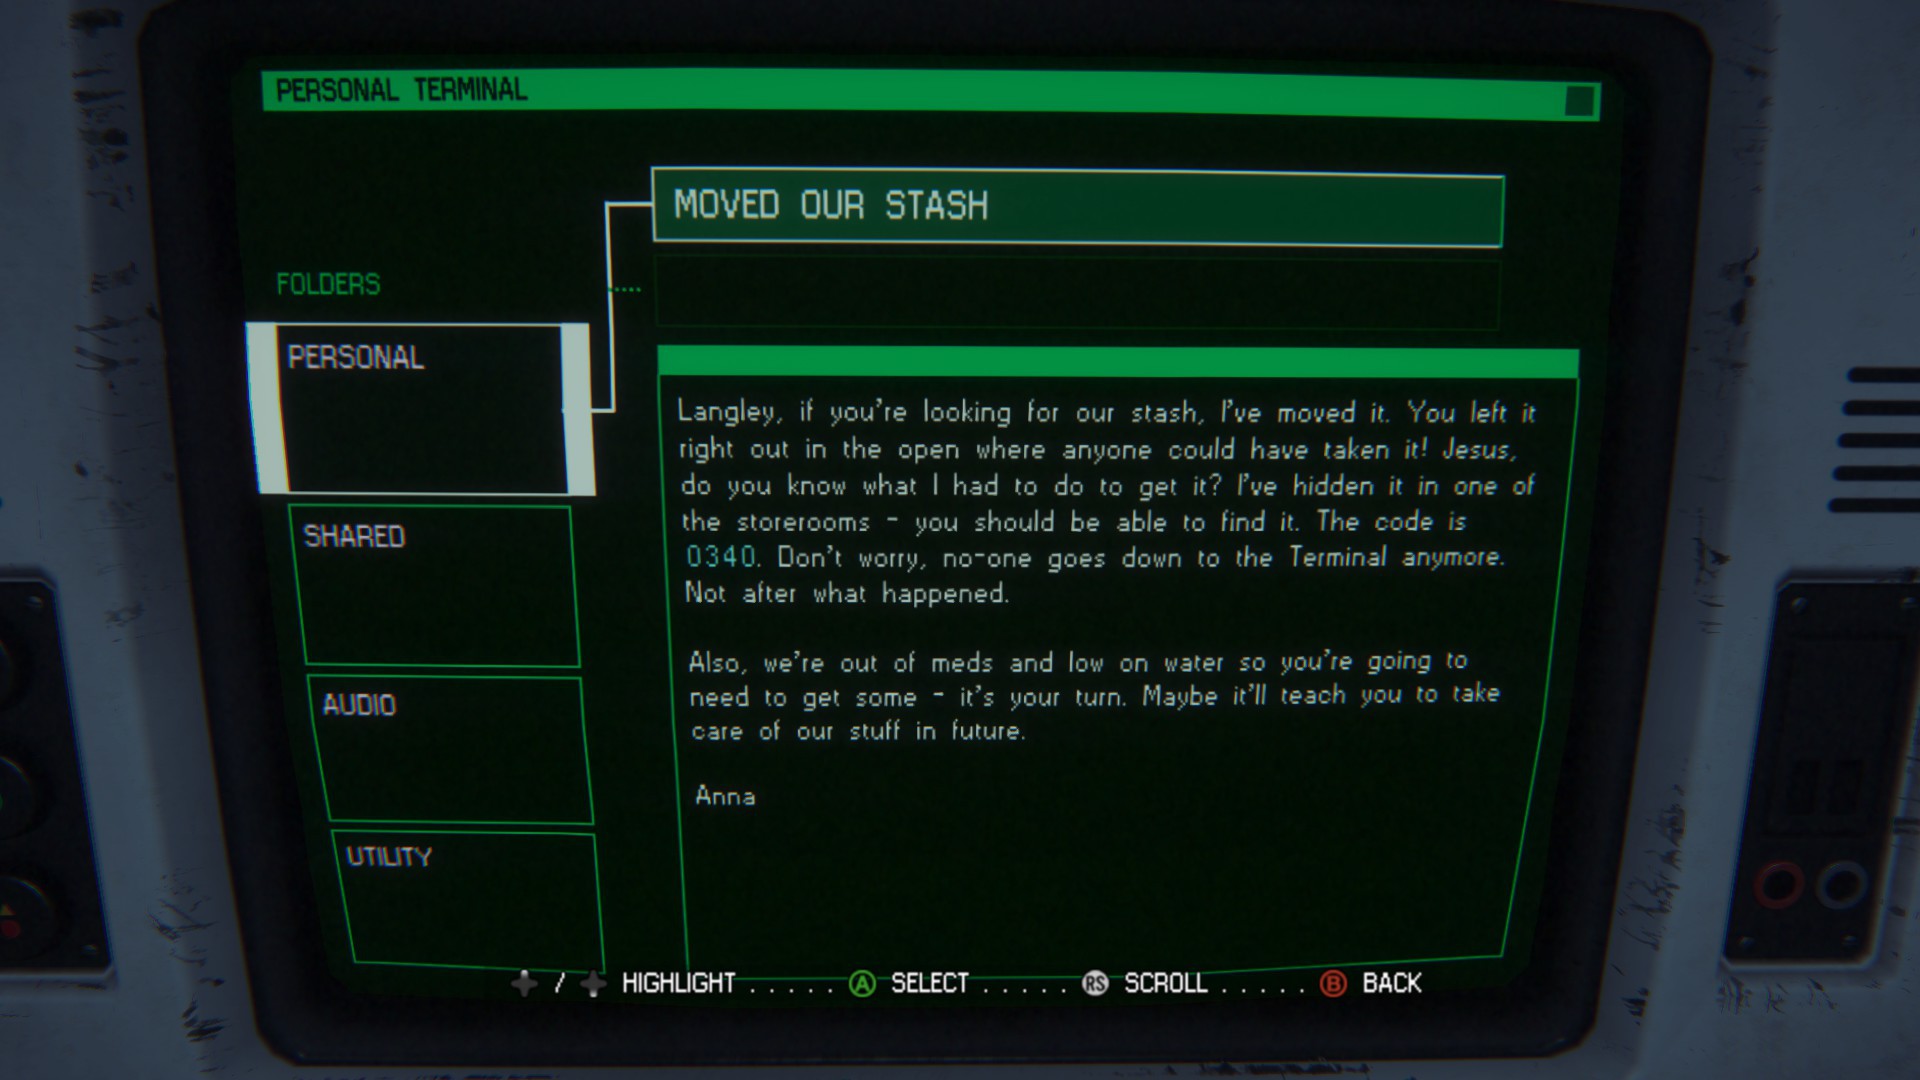
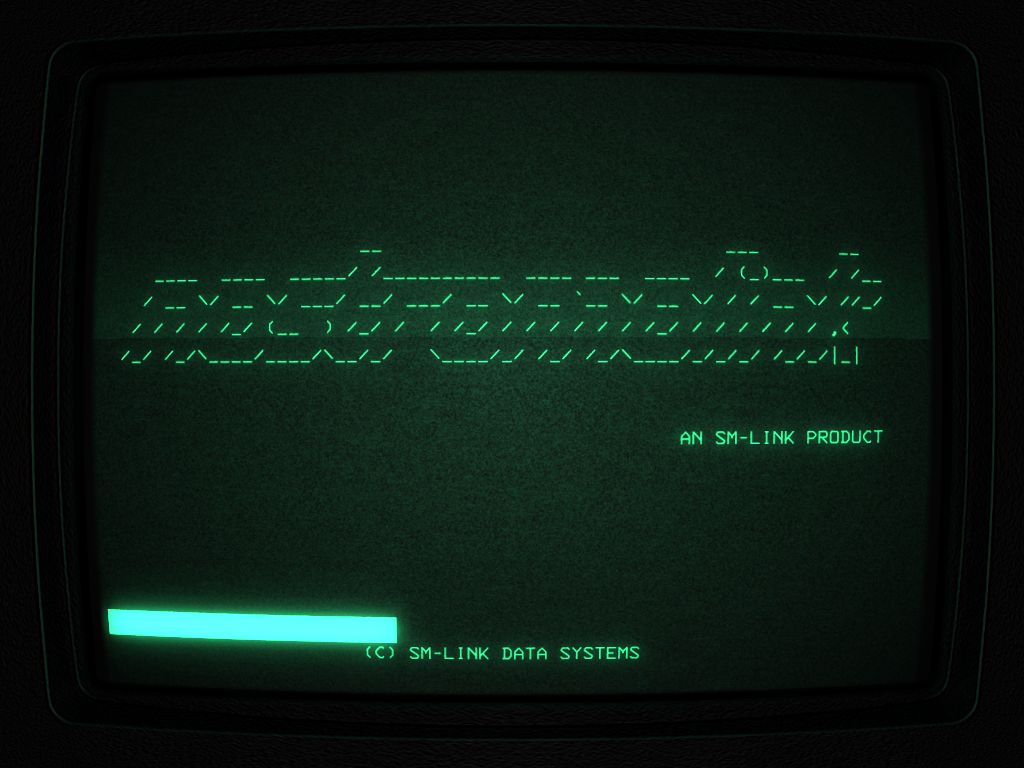
I learned ncurses a while back, when I implemented tetris. This library allows you to draw on a terminal screen, creating a somewhat graphical user interface. It’s perfect for replicating this interface. I quickly came up with an approximation in C, which I named alien-console (again available in the AUR). It is fairly customizable, allowing you to write a configuration file which specifies the title and contents of each “file”, as well as the contents of the splash screen. Here are a couple screenshots of this program running within cool-retro-term:
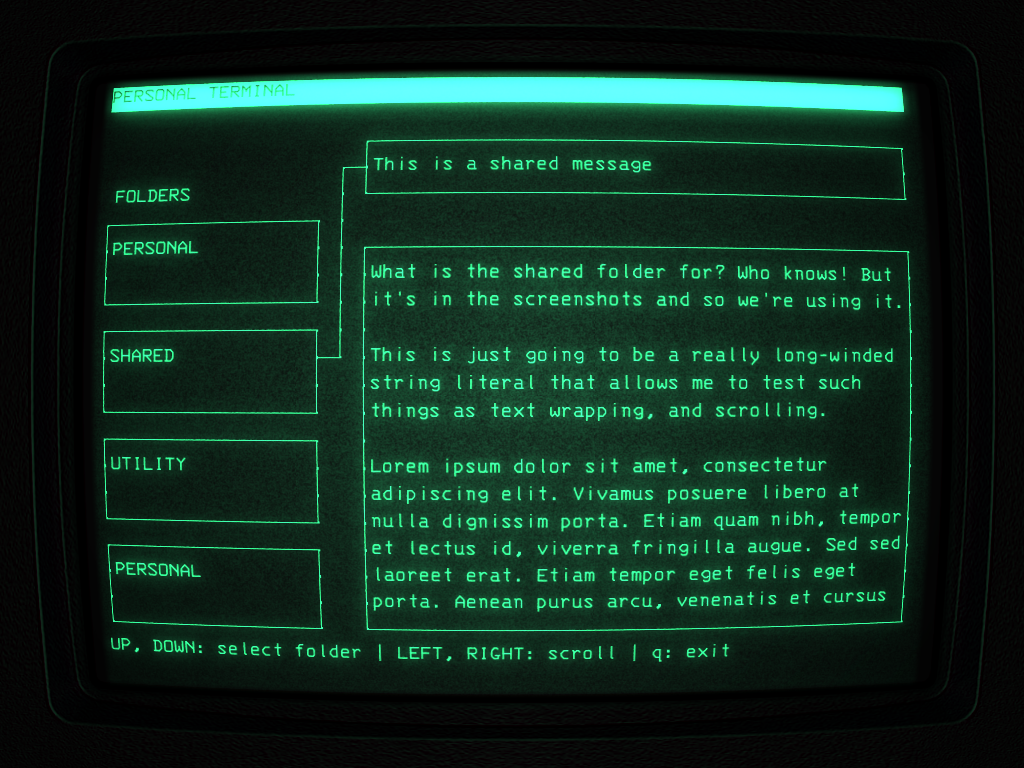
The loading screen:
Game Sound Effects
The finishing touch for the alien-console program was to make it play the same
startup sounds that it does in the game. I hoped that I might be able to find a
Youtube video containing that sound effect, but a few minutes of searching
turned nothing up. Since I happen to own the game, I was able to dive into the
installation folder looking for the sound effects. I found a directory full of
.wem files, which turns out to be a proprietary (Wwise) audio format for
games. It turns out there is a script to convert this format to
.ogg, which I then converted to .wav.
Of course, there were thousands of sound effects, and they were all unlabeled! So, to browse through the directory quickly, I wrote up a quick script that automated file conversion and let me skip from file to file with the Enter key. I also sorted the files by increasing file size (since the startup sound isn’t long compared to dialog). After a good 20 or 30 minutes I managed to find the right sound effect! I don’t really want to distribute assets from a paid video game, so I’m not going to post it.
Conclusion
I wish there were some easier way to show this off online, because the result exceeded my expectations. You can download the ISO, and you can also look at my repository to see the source code. Maybe I’ll figure out a way to take a good quality video and post it here.
If you do try it out, there are a couple known issues:
- Sound doesn’t always work (it worked on two of the three computers I tried)
- Only 64-bit processors are supported (I couldn’t build packages for 32 bit)
- Doesn’t work particularly well in a virtual machine… just put it on a USB and try it out!
Check it out if you have the chance!

Stephen Brennan's Blog is licensed under a Creative Commons Attribution-ShareAlike 4.0 International License